Hi Creative Friends,
I am jumping in with a new card design featuring a few of the wonderfully new Pretty Pink Posh holiday stamps, dies, and stencils. For this design, I used the festive Winter Wreath and Pine Wreath, along with a few other goodies (check out the supply list below).
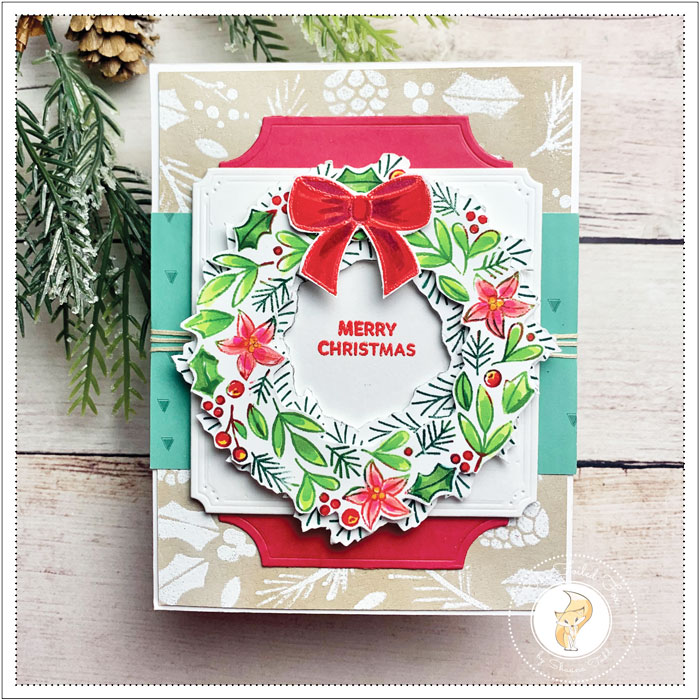
I started with an A2 white card base, a matching A2 white stock panel, a slightly smaller Desert Storm panel, and the Layering Winter Foliage stencil. I set aside the card base and white panel for now, then got to work on stenciling the Desert Storm panel.
First, and foremost, I prepped the panel with anti-static powder, then placed the first stencil from the set over top and rubbed on Versamark ink with my blending tool. When I was sure I had gotten ink into all the pine branches, holly, and pinecones, I sprinkled it with white embossing powder, tapped it off, then heat set it. I followed the same steps for the other two stencils in the set to complete the panel.

Next, I turned my attention to the wreaths. I stamped the Pine Wreath with Pinefeather green ink and stamped the Winter Wreath with a few colors like Pinefeather, New Leaf, and Candied Apple. I used mini ink cubes for this so I could get into tight corners and add spot color. After stamping, I cut them out with the coordinating dies and colored in the foliage with a few Copic alcohol markers. I also stamped the ribbon from the Pine Wreath set. I used Versamark ink so I could heat emboss it with red embossing powder (see the supply list below). It was then cut out using the coordinating die.
The rest of the pieces I needed for the card design were a white card stock square and a Candy Hearts panel. I used Papertrey Ink’s Love to Layer: Squares and Love to Layer: Notched dies to make this happen. I also cut a strip from the awesome Moda Scrap The Magic of Christmas paper pack.

With everything ready to assemble, I adhered the stenciled panel to the white card panel, then the green patterned paper strip on top. Neutral twine was then wrapped around a few times, then the whole assembly was adhered to the card base.
Next, I added foam squares to the back of the winter wreath and attached it to the top of the winter wreath. These stacked wreaths will be mounted to the top of the white square but first, the sentiment needed to be stamped and embossed onto the white square.
With the wreaths over top of the square (but not attached yet), I lightly traced the outline of the inside opening of the wreath. This gave me a good idea of where to stamp the sentiment. The sentiment was stamped with Versamark ink and then heat embossed with the red embossing powder.
Now the rest could be assembled. So, the white square was attached with foam tape, then the stacked wreaths were added on top.

The last touch was to add the notched panel (remember we cut it out in the beginning). This panel was not long to extend past the square so to add a little optical magic, I cut the top and bottom from the panel and tucked each piece on the top and bottom, just behind the popped-up square and wreaths.
And there you have it… my first Pretty Pink Posh card design of the season… I hope you liked it! ♥
Goodies Used: