A Big Thanks In A Rainbow Of Colors
Hi Crafty Friends,
Today we are sharing a cheerful card design that is easy to make. The best part is this Big Thanks card uses scraps of paper and minimal supplies.

I don’t know about you but I don’t think you can ever have enough thank you or birthday cards. These two types always come in handy. I find the ‘thank you’ card particularly wonderful to have ready after the holidays when there are so many to thank!
The few other great things about this card design are that it is easy to make, you can use any color combination you like and it is a super way to use up scraps of paper – YAY!
It all started with selecting six colors of paper I wanted to use. In this example, I dug through my scraps of paper and chose bright rainbow colors (colors listed in the goodies used list below).
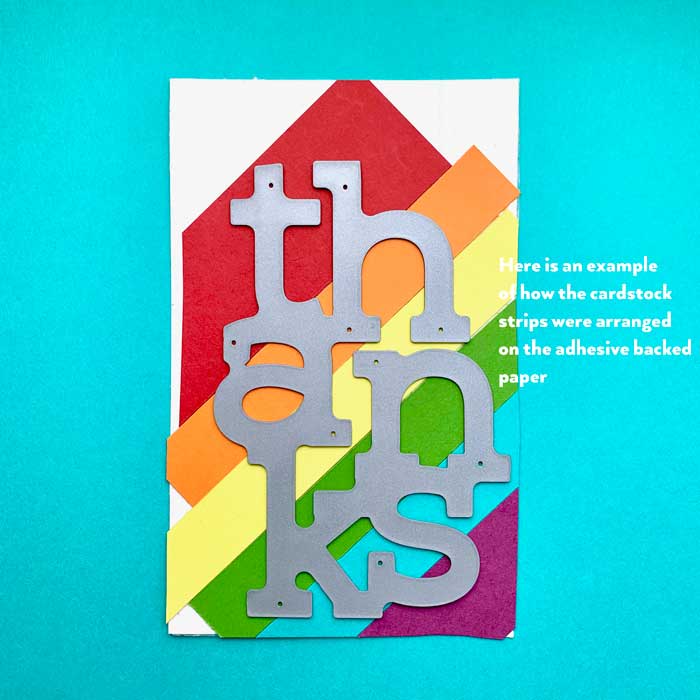
For the next step, I cut a 5/8″ strip of paper from each color, except for the first and last colors. Make these colors a little chunkier (1 1/2″ or so). Now, cut a white card stock panel a little larger than the ‘Thanks” die from Concord & 9th’s Big Thanks die set and cover the panel with a piece of the double-sided adhesive sheet (I used Stick-It adhesive sheets).
With the adhesive sheet in place, I now peeled back the release paper and exposed the sticky side. Then, placed the red strip at a 45-degree angle over the top of the panel. (By the way, you can ‘eye-ball’ the 45 degrees or if you are using a mat, like my glass mat, they have a 45-degree diagonal line printed on them for just these sorts of occasions.)

Once you have the first piece down, now you can merrily add each additional strip of color, making sure to butt the paper up against the last one laid down, until you reach the end. When done, cut out the ‘thanks’ with the die – while you are at it, cut two more white card stock ‘thanks’ too!
Now, I was ready to stack and glue the two white ‘thanks’ and then position the rainbow one slightly offset from the white, and glue in place.

Hint: If you want your colorful ‘thanks’ to really look like it was all one piece of paper (but way better than just a piece of striped patterned paper), before you adhere it to the white ‘thanks’, run it through your die-cutting machine once all by itself. This smooths down seams of paper and gets rid of any die ‘bumps’ – now you can add and glue the white ‘thanks’.
Next, I created a white cardstock card base, add a white cardstock panel slightly smaller than the base on top and then added the rainbow thanks.
The only thing left was to stamp the sentiment and heart onto black card stock with Versamark ink, sprinkle with white embossing powder, tap off the excess and heat emboss. The sentiment strip was then added with some foam tape.

Viola, the card is done. I think it took longer to tell you how to do it then to make it! ♥
Goodies Used:
Sorry, the comment form is closed at this time.



January 22, 2020
Lagene
Super COOL diagonal stripes THANKS!
January 23, 2020
Shauna Todd
Thanks for your comment! It is always so nice to hear from our readers.