Add A Little Charisma
Hi there, Creative Friends,
Penny Black has a brand new release that is jam-packed with gorgeous stamps and dies. There is so much wonderfulness that it is impossible to choose a favorite! So, over the next little while we will share different projects showcasing different stamps and dies from this release.
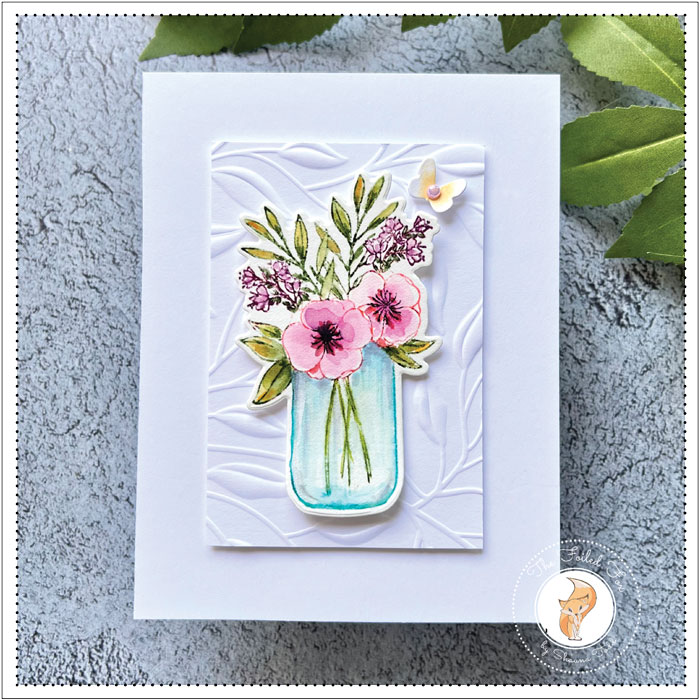
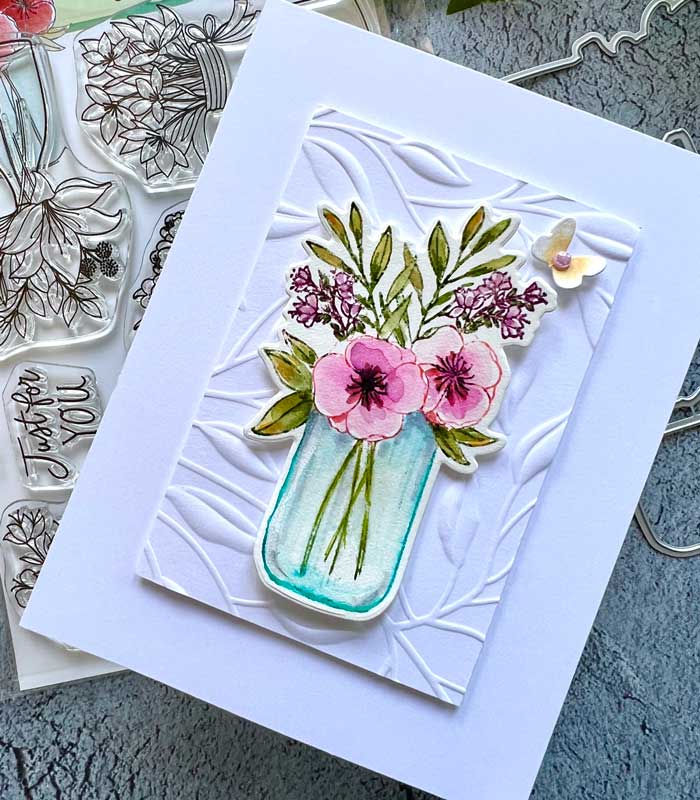
We used the very versatile Charisma stamp and die set for this card design. This set offers several beautiful vases with flowers, a sentiment, and a sprig of flowers. Here we are featuring just one of those awesome vases with flowers.
To jump in, we wanted a watercolor-y look so we started with a small piece of watercolor paper. We had hot-pressed watercolor paper on hand, but cold-pressed works too. The paper was mounted in our stamp positioner, along with the stamp.
Beginning with the large flowers, we carefully inked them with Festive Berries distress ink. We love to use the mini cubes for tiny spaces like these but the large ink pad can work too. Before stamping, we wiped off any excess ink that had gotten in other areas, then spritzed it with water and stamped.
With a wet brush, we urged the color from the edge toward the center, then added more color by picking up more ink onto our brush from a little patch of ink that we had smooched onto our workspace. We used both Festive Berries and Saltwater Taffy distress ink for the large flowers.

While the large flowers were drying, we colored the small flowers with Seedless Preserves distress ink. We used the same technique as above.
Since the leaves were tucked in amongst the flowers, creating tight areas to reach, we first used a dark green Tombow dual-brush pen to color the leaves by coloring the stamp with the pen, spritzing it with water, then stamping. This is our favorite way to color hard-to-reach areas. The inside of the leaves was colored with Peeled Paint and Crushed Olive distress inks.
The glass vase was next. We used Broken China distress inks to ink the vase, spritzed it with water, and stamped it. With our damp brush, we colored the inside of the vase. To color the stems a Tombow pen works great or a mini ink cube.

We had to do one more thing before the flower vase was done and removed from our stamp positioner. Making sure the flowers were dry, then using a black Tombow pen, we colored the center of the flower stamp and stamped. This little extra step added more definition and detail to the flowers.
After the vase was dry, it was cut out using the coordinating dies and set aside while we embossed a small piece of white card stock using the Leafy embossing folder by Spellbinders.
To put it all together, a white panel was adhered to the front of an A2 white card stock card base. Foam was added to the back of the embossed panel, then added to the front of the card base.
Little foam squares were added to the flower vase, then attached to the center. To complete the card, a tiny butterfly, cut from white card stock using the Penny Black Soaring die was placed and a tiny pearl was added.
We decided to leave the card without a sentiment. Sometimes less is more, don’t you think?! ♥
Goodies Used: