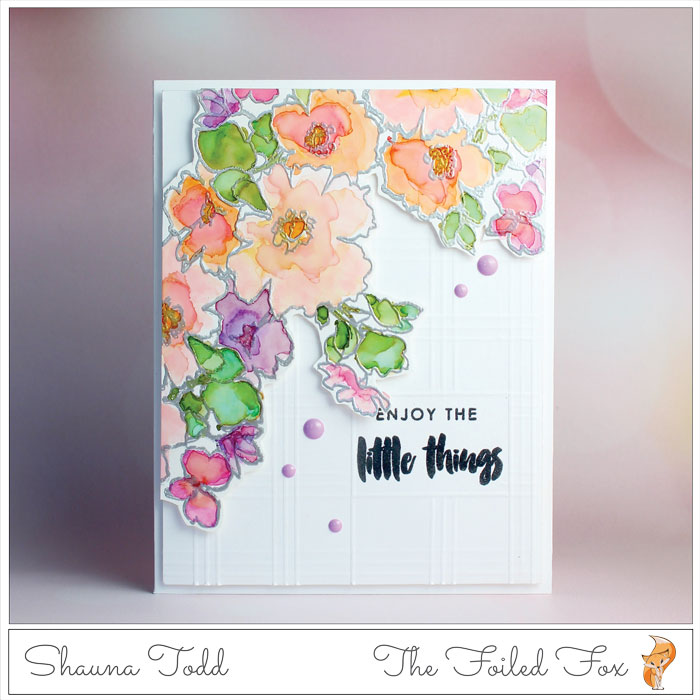
Beautiful Flowers and Alcohol Inks with a Blind-Embossed Background
Hi Crafty Friends,
I have lots to share with you in this video. The beautiful cluster of flowers in Altenew’s Charmed stamp set is the star of the show. The flowers were embossed and painted with alcohol inks for a fun and vibrant way to show them off. Then to kick it up a notch, I created a simple yet stylish blind-embossed background. Here is a video to take you through the steps.
Oh, and if you haven’t subscribed yet to our channel, please click the subscribe button. We would be so thrilled if you did! Thanks a bunch!
We have had several requests for a video on alcohol ink painting so it is finally here. It will take you through each step, take a look!
This card design was so fun to do. Alcohol inks are one of my favorite mediums. They produce unique and bright colors. The inks have a mind of their own but that’s what makes them fun! Here are a few close-ups.
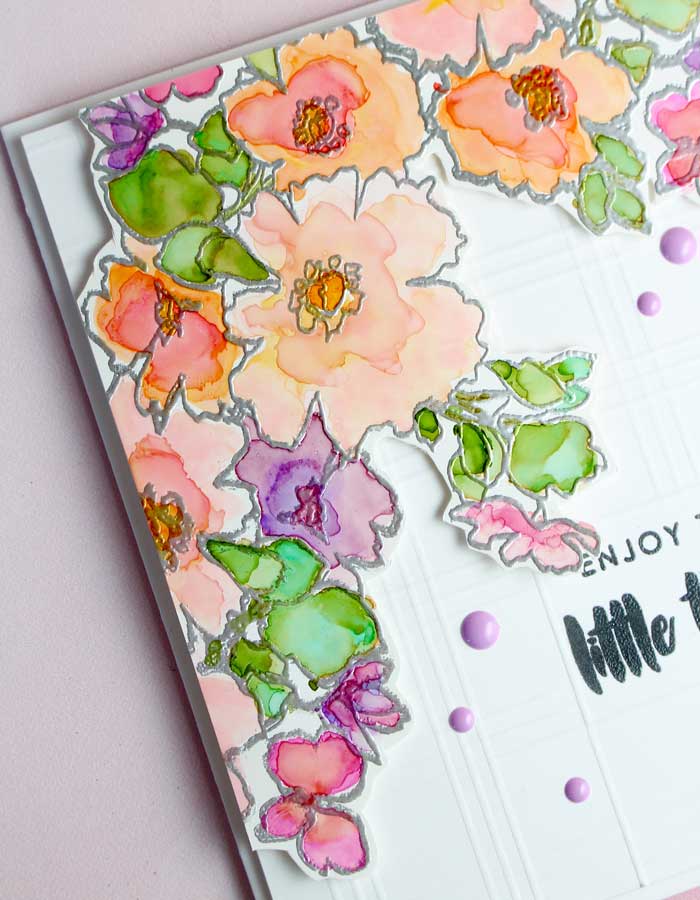
The flowers were first heat embossed onto Yupo heavy-weight paper, then painted with a variety of colors. The color combinations I used for the flowers were Salmon and Sunshine Yellow, Shell Pink and Sunset Orange, Amethyst and Shell Pink and finally Flamingo and Sunset Orange. I used one of my favorite trio of colors: Willow, Meadow, and Patina. Only a few tools are needed. I used the Tim Holtz brush in his alcohol ink kit (see all the supplies used below), alcohol blending solution and a micro brush or mini swab.
After all the flowers and leaves are painted, I fussy cut out the outline of the flower cluster and added foam tape to the back.
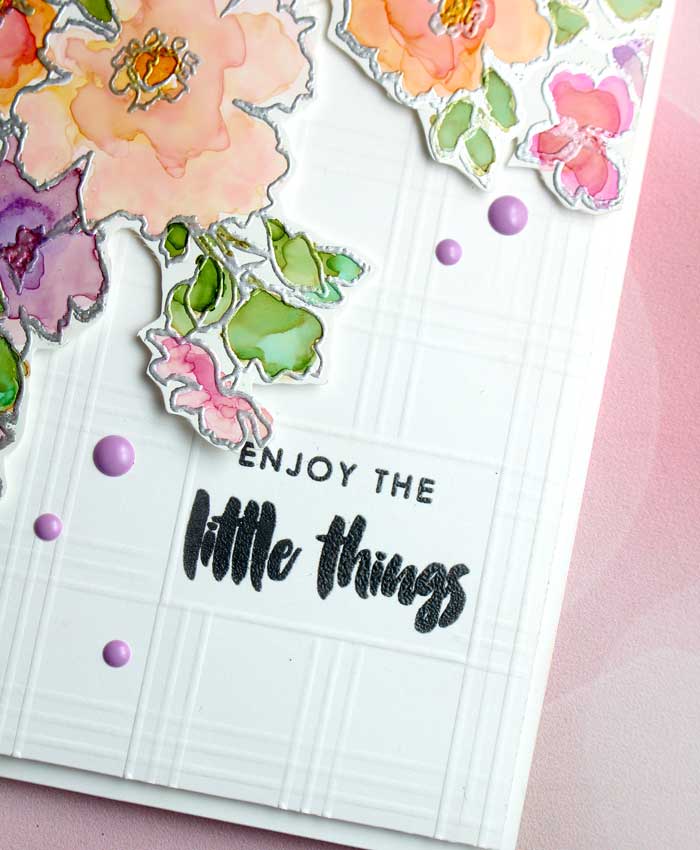
Next, I created a blind-embossed background. With the use of a scoring board and a cardstock panel, you can make quick work of it. In the video, you will see it made first hand. But the basics are to first mark a box with pencil on the back side of the paper where you want the sentiment to be, then create a pattern with lines scored on the cardstock length-wise and cross horizontally. The sentiment box size I used was 1 3/4″w x 1 1/8″ h. The basic pattern was to score, on the backside of the panel, three lines, skip four and score on the fifth line and continue to repeat this pattern from top to bottom and then across the width until the whole panel has this grid pattern. Be sure to not score any lines in the sentiment box you outlined. In the video, there is a ‘cheat sheet’ with all the measurements used and step-by-step instruction.
Once the background was created, I stamped the sentiment, Enjoy the Little Things, from the stamp set using a Wendy Vecchi archival ink, Watering Can, then clear heat-embossed it. I found that doing it this way the sentiment came out clear and legible. When I just stamped it with Versamark ink and heat embossed it, the letters blurred together making it difficult to read and not very pretty!
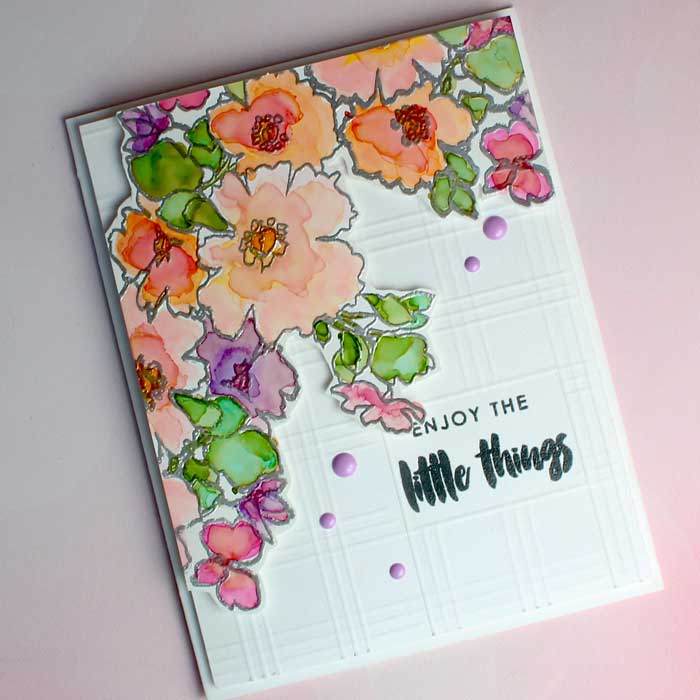
I added a foam backing to the background to pop it up and then it was mounted onto a slightly larger card base. By peeling off the release paper of the foam tape on the back of the flowers, I was able to adhere them to the card. A few enamel dots were added and there you go…. all done!
I hope you enjoyed the video and project. I had great fun creating it. Please stay tuned for more and some very special guests visiting us soon! Oh, and don’t forget to subscribe to our YouTube channel. Be sure to click the bell so you are notified of our next video.
See you soon! ♥
GOODIES USED:
Sorry, the comment form is closed at this time.

April 11, 2019
Jane
What a beautiful card. I have never painted with alcohol inks, so I will have to try it.
April 11, 2019
SuzyQ
The blind embossing makes for a classy background. It reminds me of wood trim in high homes. Great idea, usable in so many different ways. Watching you Color with alcohol inks was helpful and motivating. BEAUTIFUL Card Shauna. THANKS!
April 15, 2019
Daria
Your card is stunning. Thank you for the video showing how you made it and the tips you shared. I love the background you created.
April 17, 2019
Lagene
Gorgeous creation! Thanks for the video!