Big and Bold Christmas Poinsettia
HI Crafty Friends,
Today we are featuring a gorgeous poinsettia. This Big and Bold Poinsettia Blessings stamp set is from Colorado Craft Company. They are the master of the big and bold look!
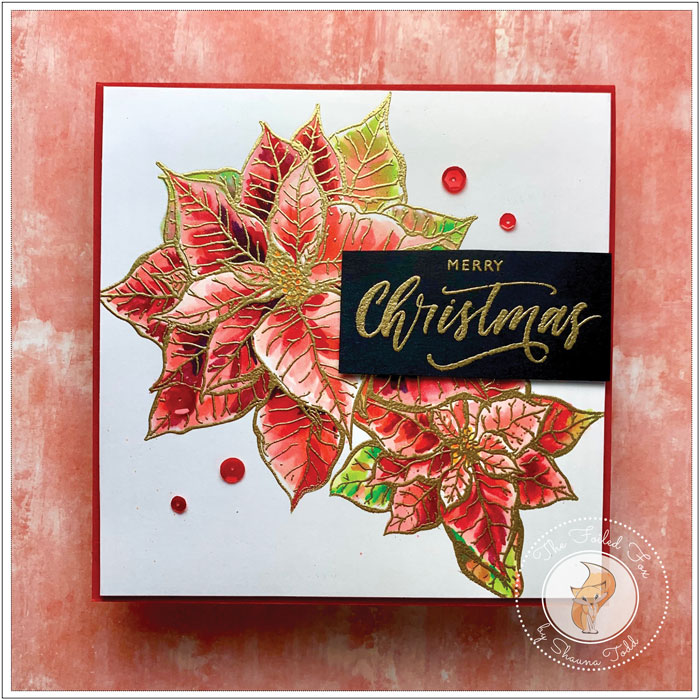
I am so captivated by beautiful, enormous poinsettia blossoms so when I saw this stamp set by Colorado Craft Company, I had to have it! The only question was what medium I was going to use. Since this is a bold design, I went with the bold colors you can achieve from Copic markers.
To start, I mounted the poinsettia stamp in my stamp positioner, along with a square piece of Neenah 110lb. card stock. I inked the entire stamp with Antique Linen distress ink. Once stamped, I left the card panel in the stamp positioner to maintain its position and began coloring.
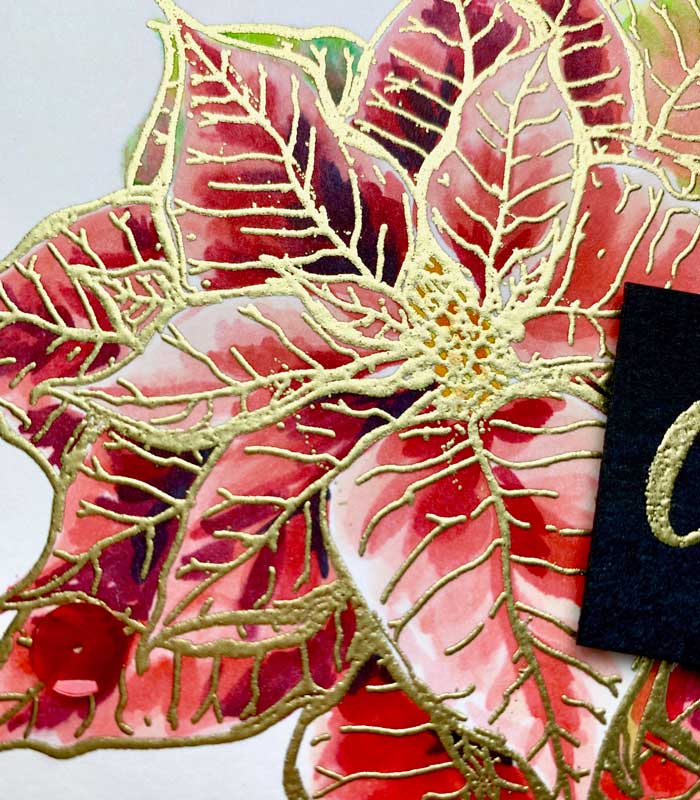
One quick note before I dive into the coloring. The reason I stamped the image with Antique Linen first was so I could clearly see the stamping but could still color over it. I do plan on stamping the image with Versamark ink again when all the coloring is done, then gold heat embossing it giving it a finished look. Doing it this way, I don’t have to worry about accidentally coloring over the embossing, and I don’t have to fret about the stamp lines. I can color over the stamp lines since I know once it is embossing, all the lines will all be restored to their beauty.
So, let’s begin. I started in the very center using a few yellow/ yell0w-orange colors of markers (see the supply list below). Then, went on to the inner petals (leaves?) using the lighter reds (R0000, R01, R20, R22). To me, one of the joys of a poinsettia is those lighter petals in the center of the flower so I was careful not to get too overzealous with the darker colors at first. As usual, I colored the petals with the lightest color, gradually building to the darker colors, then smoothing out the color with a lighter color again.

Once the centers were done, I continued with the other petals (or are they leaves?), using the same lighter colors of markers but also intensifying the color with the darker reds.
If you are like me, it really helps to grab an image of poinsettias from the internet and use it as a loose reference. My image shows the pinkish, green leaves on the outside so I colored it just as I saw it, using some green colors as referenced in the supply list.

The coloring was now done, so with the panel still in the stamp positioner, I generously slathered on anti-static powder, then stamped the image again with Versamark ink. I sprinkled gold embossing powder over the image, tapped off the excess, then heat embossed it.
To mount, I trimmed the panel slightly, added foam to the back, and mounted it onto a red Peppermint, square card base. I stamped one of the awesome sentiments included with the stamp with Versamark ink onto black Licorice card stock, then heat embossed it with gold embossing powder. The sentiment was then trimmed and mounted with a bit of foam tape.

To finish, I added a few red sequins!
Before I go, I want to mention (in case you missed it), we are having a Holiday sale- YAY! Check out the details below.

Goodies List: