Blooms For Your Day
Hi Creative Friends,
I am popping in to share another way you can use the lovely Blooms stamp set by Penny Black. You may remember that I shared a card design on Monday using this same stamp set (did you miss it, no worries, you can view it here). Like so many of Penny Black’s stamp sets, it is filled with sweet flowers to use for many occasions.
Hint: if you love Penny Black’s flowers like we do, check out all the new goodies in our shop!
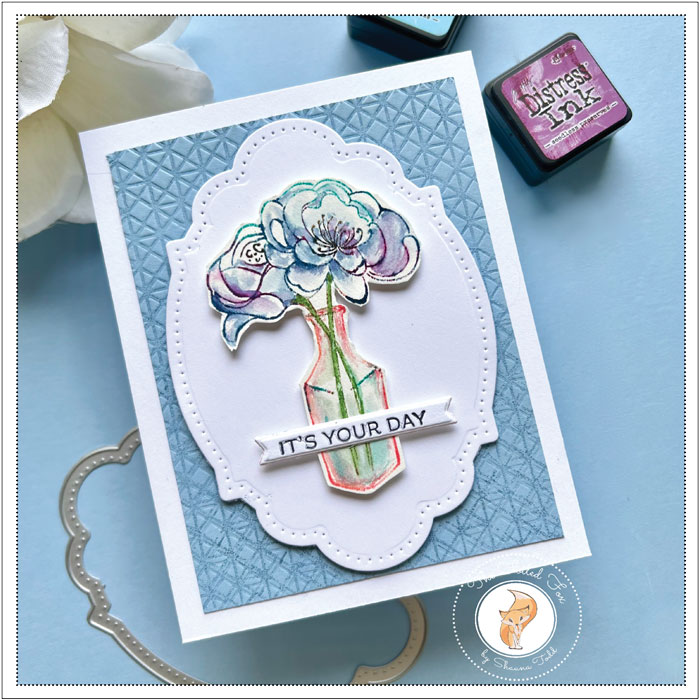
This card design started the same as the last one by first mounting a piece of hot-pressed watercolor paper (I added three brands to choose from in the supply list below in case you need some) in my stamp positioner. From there, I inked the bloom with three distress ink colors – Tumbled Glass, Faded Jeans, and Seedless Preserves distress inks, then lightly spritzed it with a fine mist. As I mentioned before, if you are looking for a good mister, the Spellbinders Mighty Mister does a good job of this. At first,I thought the mister was only capable of a long spritz but soon I got the knack for it. Now, I love it!
Once the bloom and butterfly were stamped, I used a small damp brush to spread the ink into the interior, adding bits of extra color when needed.
The vase was inked with Saltwater Taffy distress ink and the stems were colored with a green Tombow pen (I love how you can color small spaces with Tombow pens!), From there, a damp brush was used to spread the ink, along with a little Tumbled Glass.

When the coloring was done and dry, I fussy cut out the flowers and vase, then added foam squares to the back of each.
Next, I made an A2 white cardstock card base and set it aside. Then, I cut a Candy Pearls blue 3 3/4 X5″ cardstock panel.
To make the panel more interesting, I inked the inside of the Penny Black Triangle Pattern embossing folder with Faded Jeans ink, carefully added the blue panel, and then ran it through my die-cutting machine using my rubber mat. The panel was then mounted on the front of the white cardstock card base.
A decorative shape was cut from white card stock using the Papertrey Ink Psalm Reflections and then added to the front of the card base. Foam squares were used to pop it up a bit.
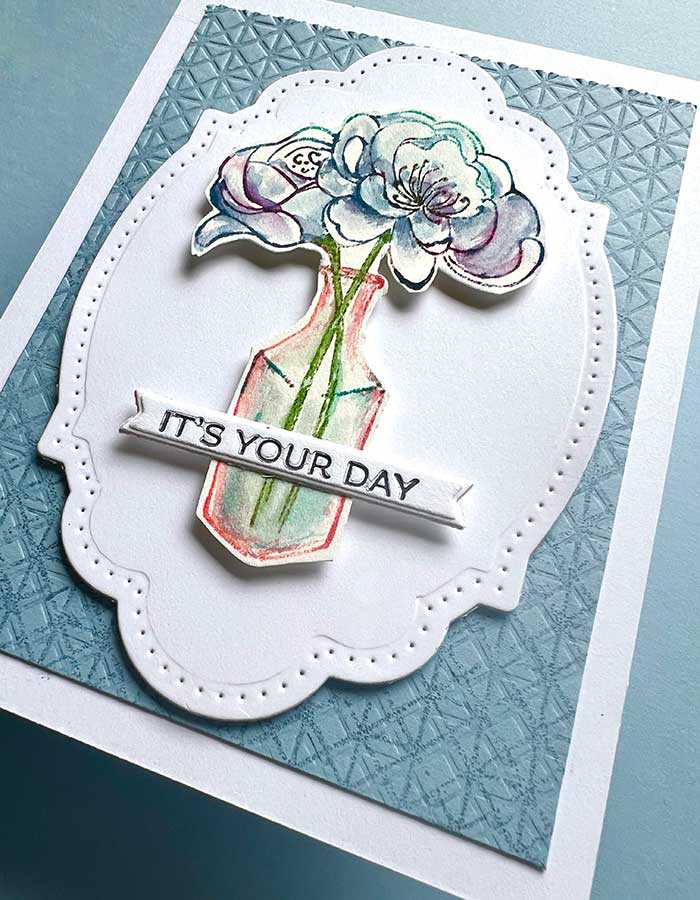
From there, the flowers and vase were mounted in the center of the decorative-shaped panel. For the sentiment, I again reached into my stash of sentiments. By the way, earlier, I had used the ‘It’s Your Day’ BetterPress press plate, black ink, and BetterPress platform assembly to make several sentiments at once. It certainly saves time when you can do a bunch of sentiments at the same time, especially since it has an accompanying die to cut them all out at once!
Viola! The card was done! I think this stamp set creates the sweetest cards that would be perfect for nearly anyone on your list! ♥
Goodies Used: