Create Your Own Winter Magic
Hi Crafty Friends,
We are back with a very special blog post by our good friend, Lisa Tilson of My Card Trip. She has taken the Winter Magic pop-up kit and created a selection of cards and tags to show you that you don’t have to use it just for just a pop-up card (though it is great for that too!). She has made cards and tags, each one will delight your holiday spirit self. So grab your favorite beverage and dive in, and let your fancy be tickled!

Hello everyone, Lisa here today to share some winter magic with you! Have you seen the Winter Magic Kit? This is an absolutely beautiful Christmas/Winter kit that Foiled Fox has created in collaboration with Papertrey Ink. I have several projects to share with you today using many of the items in the kit, but not all – there are lots to choose from! There is an add-on interactive element you can purchase in addition to the main kit which gives you the option of creating a pop-up card. I didn’t use that today, but Shauna has created a great video (click here) showcasing how that element can be used to create a Christmas village scene – it’s glorious and so festive!

A2 card
My first card is an A2 top folding standard notecard. I just love the scenes you can create with the houses/trees – and you have lots of options to chose from. There are three houses and two types of trees in differing sizes/configurations.

I began by cutting 3 snowbanks using the snowdrift dies from Winter Magic: Scenery. I lightly blended Tumbled Glass Distress Oxide onto the top edge of each one and then adhered them flat onto an A2 white panel. At this point, I also lightly blended Tumbled Glass Oxide onto the top of the panel and adhered this onto an A2 top folding base card.
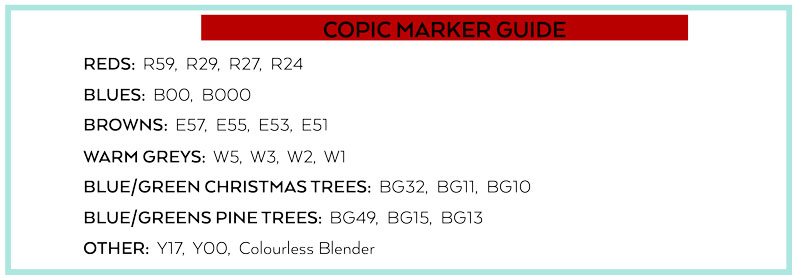
I stamped out a whole bunch of trees and houses onto Neenah 80lb and then coloured them with Copics (all the numbers are listed below) and they were cut with the coordinating dies. I arranged them across the panel and then adhered them all flat using Multi Medium Matte.
The sentiment is from Winter Magic: Snowman and was stamped onto red cardstock using Versamark Ink. I applied Hero Arts White Embossing Powder and heat set. This was popped up with foam tape. I added a few sparkling clear sequins for embellishment.
Slimline card
For my next card, I changed them up a little and created a slimline card. The overall look is similar to the A2 card as I have kept all my colours the same for all the projects, it’s like a little stationery set! I thought it would make for a visually more cohesive blog post – but also I just love the combination of light blue, teal, and red on a Christmas card. The slimline card gives the illusion of a street whereas the A2 card looks a little like a steep village, stacked with houses.

I used the houses, trees, and Christmas tree from the main kit but for this card, I created my sentiment using the banner from Winter Magic: Banner set. To start I cut a stitched panel using MFT Slimline Starter set. I blended Tumbled Glass Oxide down from the top so it would finish just above my snowbank. The snowdrift dies in the main kit are pretty much almost as long as the slimline stitched panel, so I die cut the bank and then continued to cut so that it would fit my panel. I also knew that I would have images over the edges so you wouldn’t notice I had extended the bank a tiny bit!

Again, I stamped all the images onto Neenah 80lb and coloured them with the same Copic colours as the first card above. For the Christmas tree, you have an option to add a garland. So I stamped that onto my Copic coloured tree using Versamark and applied a red embossing powder and heat set. I die cut them all and set them to one side. The greeting from the banner set was stamped with Versamark Ink and heat embossed with Hero Arts White Embossing Powder. Once again, I arranged my images and then attached them to the panel either with foam tape or Multi Medium Matte.
Tags
To finish off my little card set, I created two tags.

I began by die cutting Lawn Fawn Tag You’re It four times from Neenah 110lb cardstock. For both tags, I cut a small snowbank from white cardstock and then ran that snowbank piece through my Gemini Junior with the Lawn Fawn tag die so that it would have the same rounded edges and would fit perfectly onto the tag base. I blended Tumbled Glass Oxide from the bottom up, and top-down, on each of the two tag bases before adhering the snowbanks. The images are from Winter Magic: Snowman and the main kit set and were coloured with Copics, and die cut with the coordinating dies. Both sentiments are from Winter Magic: Accessories and were stamped using Versamark onto red cardstock and then heat embossed with HA White Embossing Powder. I trimmed the sentiments into banners and popped them up with foam tape.

I took the remaining two white cardstock tag die cuts and adhered them onto the backs of the completed tags, so give them some stability. To finish them off, I threaded some red polka dot ribbon through the eyelet on the tag and then tied that with a red/white twine bow.
I hope that you enjoyed seeing these ideas for using the kit. Shauna shows many other ways you can create with the kit in her video (see below). Thank you so much for joining me today, happy crafting!
Goodies Used:

