Adorable Beach Bears
Hi Crafty Friends,
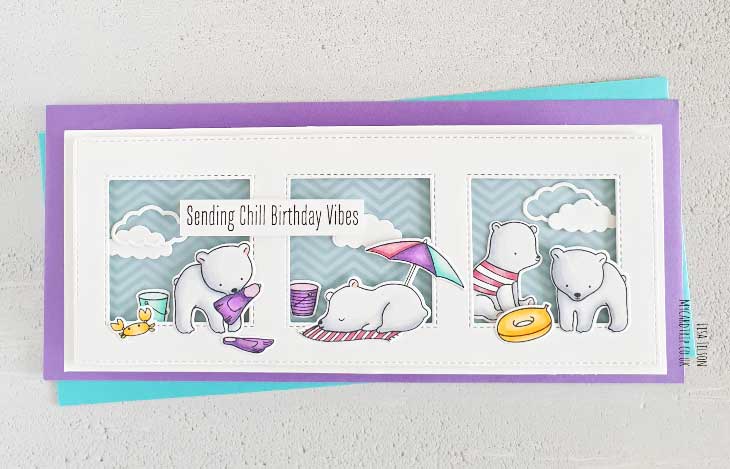
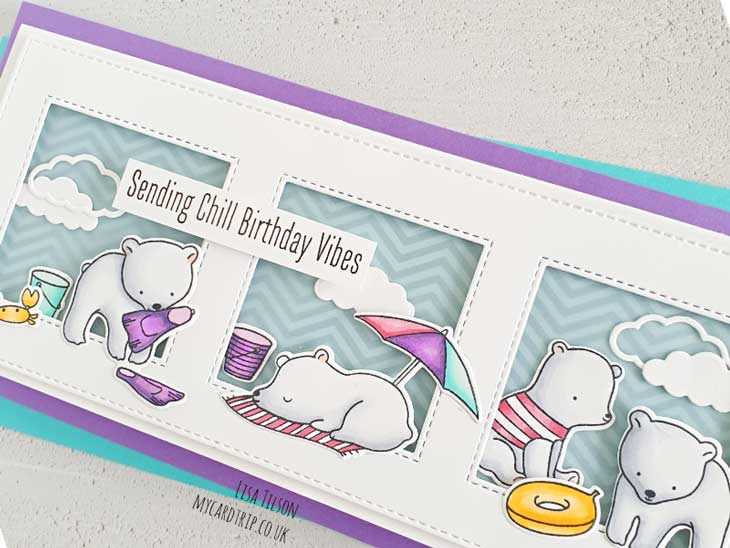
We are so very excited to share an awesome slimline card by Lisa Tilson of My Card Trip blog (@lisatilson). She used the adorable bears from the Beach Bear stamp and die set by My Favorite Things and pastel colors to create a soothing and relaxing beach scene. They are absolute ‘chill’ lounging around and soaking up the rays!
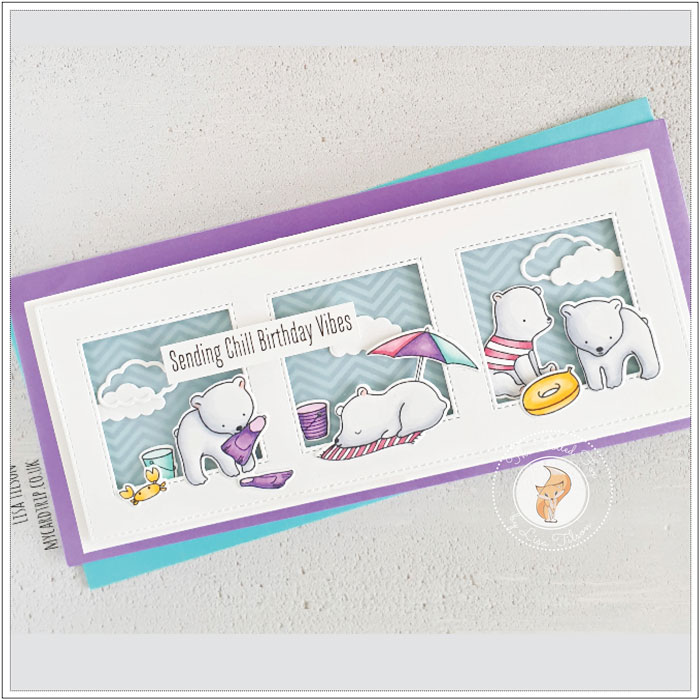
Hello everyone, it’s Lisa here with you today to share a card using a recently released bundle of cuteness from My Favorite Things. The adorable bears on show today are from the sweet Beach Bear set and I have created a slimline card. But with a bit of a difference, at least for me! I rarely use patterned paper and it’s been years since I used it behind vellum. I like how the vellum softens the pattern, you get the interest without the pattern overpowering the scene.
To begin, I cut a Neenah Solar White 80lb stitched rectangle panel using the MFT Slimline Starter Dienamics set. I then took the MFT Stitched Square Trio Dienamics and taped that centrally over the stitched panel and ran it through the die-cutting machine. I cut a strip of vellum, sized so that would sit behind the windows. And instead of ink blending my background in each window, I thought I would add some patterned paper instead. I took a piece of blue patterned paper from Fresh Squeezed Chevron and cut it down so it would fit behind the window.
Note: As my window panel is wider than the 6” x 6” patterned paper, I cut another small piece of patterned paper and joined it with the larger piece, securing it at the back with double-sided tape. You won’t see the join as its behind one of the white bars in between the window and also obscured by the vellum.
I put all these elements in a pile as I wouldn’t need them until I came to assemble the card and I set about colouring my images. I stamped almost all of the images from Beach Bear onto some Neenah 80lb cardstock using Memento Tuxedo Black Ink. I coloured them with Copics and then cut them out with the coordinating die-mamics. The colours that I have used are listed below.
Now all I needed to do was assemble the card. So, I created a horizontal top folding slimline card base card which measures 3.5” x 8.5” and then I adhered my panel of patterned paper onto it using wet adhesive (so as I could wiggle it around and make sure that it wouldn’t show beyond the window panel. I then added a tiny amount of MFT On-Point Precision glue around the edge of the vellum and adhered that down on top of the paper.
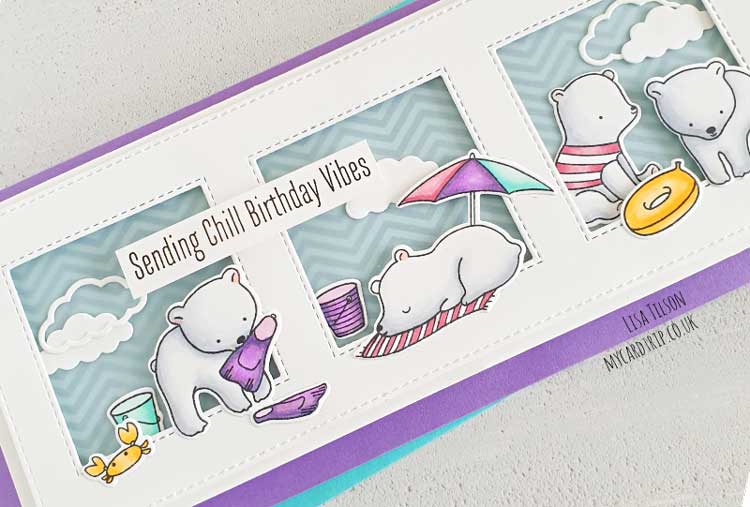
For some dimension, I added foam tape to the back of the window panel and pressed it down over the base card. Then all I needed to do was simply arrange my images amongst the windows. Some were glued directly onto the vellum and some were popped up with foam tape (and some had both if they straddled the frame and lower level!). Next, I stamped a sentiment from the set onto some white cardstock, trimmed it down, and set it to one side. I thought the top area of the windows looked a little bit empty so I die cut some clouds from MFT Cute Cloud outlines and positioned those amongst the three windows before adhering the sentiment down over the top with foam tape.
And that brings me to the end of my card. Aren’t they just the cutest bears and I hope they are having better weather than we are here in the UK! If you were to go to a beach in the UK at the moment, you wouldn’t find anyone there, or those that were brave enough to go would be huddled behind a windbreak with their umbrellas up! Happy summer to us!
Learn more about Lisa:
Goodies Used: