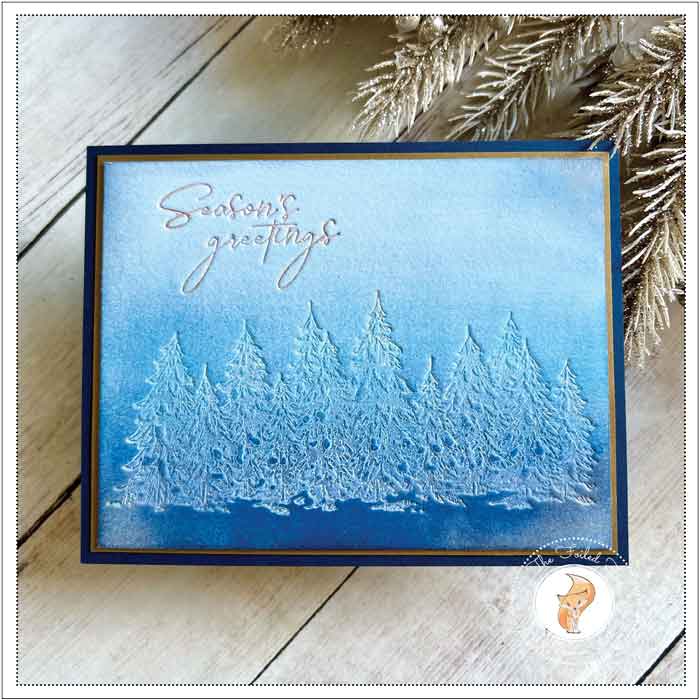
Evergreens At Midnight
Hi Creative Friends,
I am back sharing a holiday BetterPress (letterpress) card with you today. I am always amazed at the fantastic letterpress results you get using the Spellbinders BetterPress system and nothing could be easier!
For this project, I used the Season’s Greetings Evergreen press plate and die. It has everything you need to make a gorgeous card in minutes. If you haven’t tried using the BetterPress system, you should really consider it!
If you have followed our YouTube channel or anyone else that has featured the Spellbinders BetterPress system then you know the basics so I won’t go into that too much. But if you want to know more click here and you can get acquainted or reacquainted, whatever the case may be.
Before I letterpressed this design, I first started with an A2 double-weight porcelain BetterPress paper panel (see supply list). You don’t need to use the double-weight but I like the heft and feel of the double-weight. It also adds a little dimension without using foam or multiple layers. The BetterPress paper is cotton rag making it perfect for letterpress but you can use regular cardstock too.
With the panel and a blending brush in hand, I started adding color with a few distress inks. I first used Faded Jeans over the whole panel, then added Uncharted Mariner in the middle, and then Chipped Sapphire at the bottom. This created a beautiful ombre effect.

When done, I mounted the panel onto my chase (plastic top plate to the BetterPress system). Ordinarily, I would tape it in the corners to hold it in place but I didn’t want anything to mess up my ombre coloring. So, to avoid the corners, I did an old-school tape loop (you know where you take a piece of tape, make a loop), then attached it to the back of the panel and pressed it into place.
I positioned the trees and the sentiment onto the magnetic base (platen). The fact that it is magnetic and there are guidelines on the base makes it super easy! Next, I inked up the tree plate with white ink and the sentiment with shimmery gold ink (see supply list). I also added a bit of gold ink to the trees, here and there. I added the chase (plastic plate with the paper panel attached) on top and ran it through my die-cutting machine. VIOLA! the panel was done!
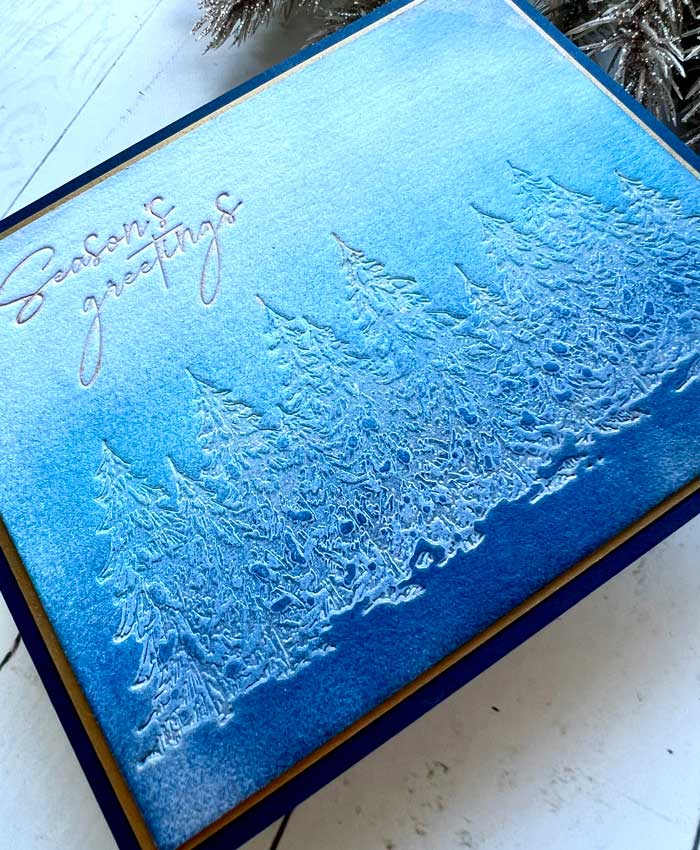
The letterpress part is all done. I just needed to remove the panel from the chase (top) and mount it. I used a slightly larger piece of Shimmer Antique Gold paper and applied the letterpressed panel on top. To finish, this assembly was added to a larger dark blue card stock card base.
That is all there was to it… super easy and luxurious! ♥
Goodies Used: