Have A Very Jolly Holiday!
Hi Crafty Friends,
Today’s card design is a bright and cheery winter scene, complete with the quintessential snowman and ice pond. The big sky sets the stage for the wintery look and the trees and village add to this Jolly Holiday scene.
Oh, what fun I had using all Penny Black dies to make this card. Let’s get started.
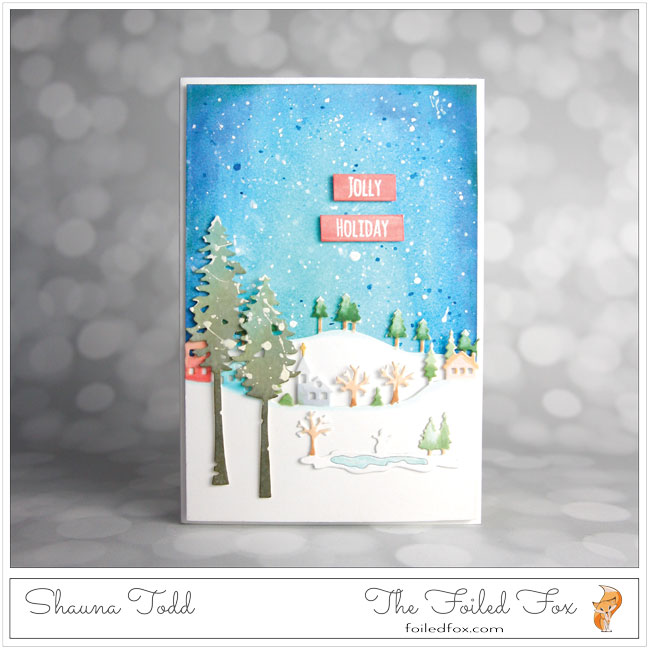
The first order of business was to make the sky so I started with a piece of hot press watercolor paper. I prefer hot pressed watercolor paper since it has a smooth finish but a cold pressed paper works fine too. You can use any watercolors you have but I used a few Dr. Ph Martin’s Hydrus watercolors. Some people think the “Martin” watercolors are pricey but really you get at least twice as much as other liquid watercolors. I love them for their rich intensity.
For this project, I used Ultramarine, Phthalo Blue and Titanium White. I added a drop or two of each color, each in their own well of the plastic palette (see in supply list) and then used a few other wells in the palette to blend and/or add water until I got the colors I was looking for.

I started by painting the entire panel with a lighter blue, quickly dried it a little, then added more intense colors on the sides, leaving the center lighter. After I thought the sky was done, I splattered Dr. Ph. Martin Bleedproof White Ink for the falling snow.
Now that the sky is done and drying, I went to work cutting the dies. From Neenah white cardstock, I cut one each of the Penny Black Trees and Hills, Winter Village and Tall Trees. For the Trees and Hills and Winter Village, I purposely left a lot of space at the bottom of each die so I could layer them on top of one another, creating a dimensional card.

I colored the houses and row of trees with light colors of Copic markers. There is a Copic guide below if you want to check out what colors I used. The two “Tall Trees” were colored by using a few distress inks: Evergreen bough, Peeled Paint and Forest Moss for the darker bottom section. Then, they were generously splattered with the white ink used earlier.

Now, I was ready for assembly of the front panel and finishing the card. The front panel was assembled by adding the row of trees on top the watercolored sky, then adhering the winter village with foam tape on top of the row of trees, leaving enough room in the foreground for the pond to be added and the Tall Trees with a little foam tape. The completed front was popped up with some foam tape onto a white card base slightly larger than the front.

The sentiment was the only thing left to do. I didn’t have a matching piece of colored paper to stamp the sentiment on so I colored a strip with Copic markers R01 and R22, then stamped the ‘Jolly Holiday’ from the Penny Black Christmas Sentiments stamp set with Versamark ink and heat embossed it with white embossing powder. The sentiment was then added with a piece of foam tape. Oh, and a touch of clear Wink of Stella was added to the pond for an icy look!

And there you have it, another holiday card ready to send! Thanks for joining me. I hope to see you next time! ♥
![]()
Goodies Used:

Sorry, the comment form is closed at this time.

December 7, 2018
Lagene
Wonderful layered card, I love the snowy sky!