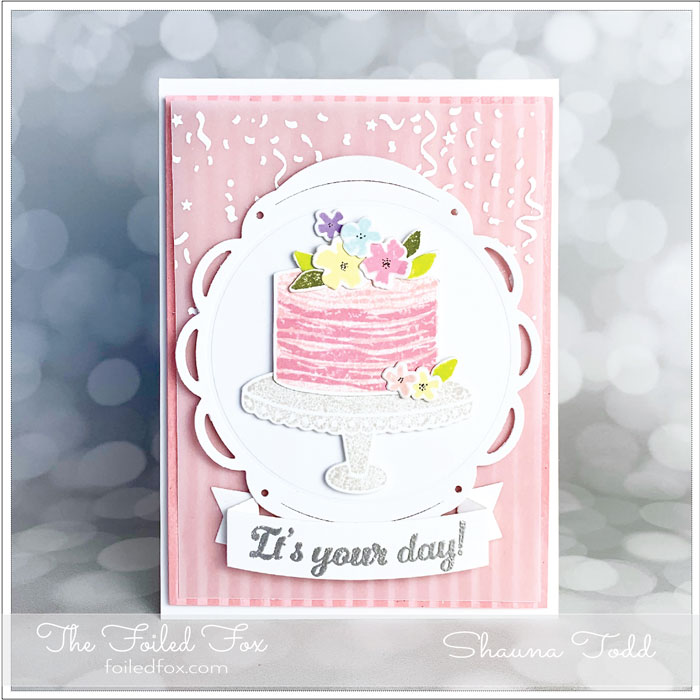
Make A Wish…It’s Your Day!
Hi Crafty Friends,
One of my favorite types of cards to make is a birthday card. Mostly because coming from a large family I am always in need of one and they are great to have on hand. This card design is a sweet, feminine one using the Pinkfresh Make A Wish stamp and die set and a wonderful fancy-shaped die from Papertrey Ink, making its debut. Papertrey Ink is a new line The Foiled Fox shop will be carrying.. so keep your eyes peeled for more in the coming week.
In case you don’t know about Papertrey Ink, they ALWAYS have fresh and fabulous stamps, dies and other creative and cool stuff. They also create for their new division, Ink To Paper, which is super awesome too! Check that out too!
Let’s jump into the ins and outs of making this card design…
First things first, starting from the bottom up, I made a white card base from Neenah 110lb. card stock and set that aside until assembly. Then, I cut a slightly smaller front panel from a piece of Cotton Candy cardstock. I added embossed lines to this panel by taping down the panel, then placed the Carta Bella Glamour Stripes stencil over top. With Versamark ink, I inked all the lines, then heat embossed it with clear embossing powder for a tone-on-tone look. With that panel is done I set it aside until assembly.
Next, I cut another panel from heavy vellum which was slightly smaller than the pink one. Using the Ink To Paper Confetti and Streamers stamp, I grabbed the Versamark ink again, inked up the stamp and stamped the vellum. The inked design was then heat embossed with white embossing powder. Now, with one more panel done, it was set aside until assembly.
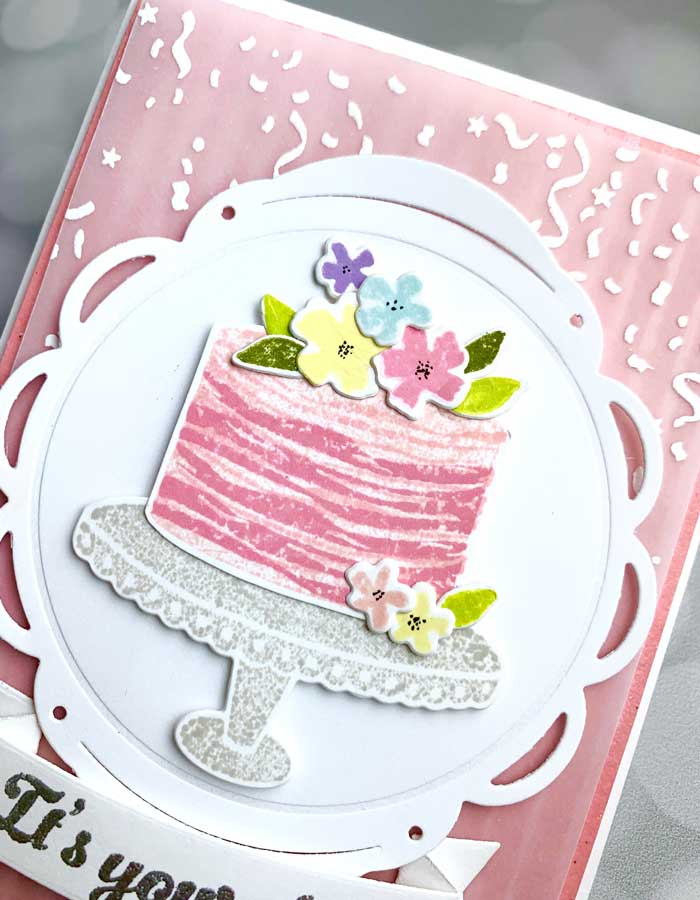
Using a new item in the shop, the Scene It – Doily Tag Base by Papertrey Ink, I cut out one decorative panel from Neenah white card stock.
I saved the best for last – the birthday cake – YAY! I love cake, real or otherwise! This cake was created using the Pinkfresh Studio Make A Cake stamp and die set. I just love this set. It has soooo many stamps you can use and it also has all the matching dies too!
The body of the cake was stamped onto Neenah white card stock by first using My Favorite Things Peach Bellini ink and then using the cake detail (wavy stripes) stamp, I added the detail to the cake body using MFT’s Bubblegum ink.
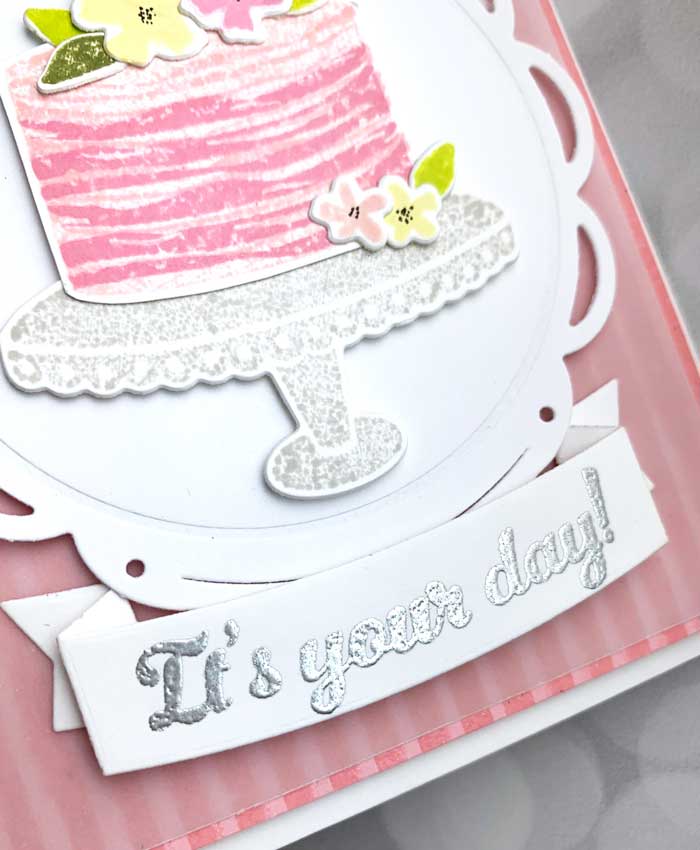
The cake plate was stamped with MFT’s grout ink and for the flowers and leaves, I used: MFT’s Banana Split, Bubblegum, SnoCone, Perwinkle, Limelight, and Olive. Then, all these pieces were cut out using the matching dies.
Next was to put it all together. To do this, I added a piece of foam to the back of the pink panel and mounted it on top of the white card base. Then the vellum panel was popped up with bits of foam but only in areas that I knew the next layer would hide it. The Doily Tag was also added with foam tape. Finally, I added the cake and its decoration with bits of foam tape.
With the design nearly finished, I stamped the “It’s Your Cake” sentiment, using Versamark ink, on a white banner that I cut from the My Favorite Things Tag Builder Blueprints 7 die set. Finally, I heat embossed the sentiment with silver embossing powder and mounted the banner with glue dots.

And there we have it, an adorable card waiting for the right birthday girl. ♥
Goodies Used: