Frosty, Wintery Starflakes
Hi Everyone,
I am squeezing in another project. This one was created for the Papertrey Ink-Ink To Paper Youtube channel. It features the brand new and beautiful Starflakes die set. These are perfect for a wintery, frosty scene. Please have a look at the latest video to see how they were made.

Here is the video for your viewing pleasure.
Making the background came first by first cutting out all the starflakes with masking paper and braying them down on a piece of cold-pressed watercolor paper. Once the flakes were stuck down as well as possible, the panel was moistened with water, and then I used Daniel Smith Ultramarine turquoise watercolor paint to color the panel, with the color more intense at the top. But you can use any watercolors you have on hand. You can also use the Daniel Smith dot chart listed in the supply list. It has oodles of samples of colors and it gives you a chance to try them all out. The best part is that you can use the colors for more projects then you can believe.

After it was dried a bit, more splatters of paint were added to the panel. I dried the panel again, then splattered a mixture of perfect pearls and water, as well as some white ink (white gouache shown in the supply list works well too).
While the panel was drying, it was time to make the starflakes. They were first cut out of Neenah white cardstock, then slathered with Gina K glitz gel. This makes quick work of this step but if you don’t have glitz gel you can always thin your favorite liquid glue and dip it in glitter (see supply list). Let the starflakes get good and dry.
In the meantime, I cut out the word ‘Joy’ from the Joy frame by Papertrey Ink-Ink To Paper, using Pure Poppy cardstock. I also stamped an ornament and evergreen boughs from the Tree Essentials stamp set. The boughs were stamped with Pine Feather ink and the ornament was stamped with Lovely Lady, Autumn Rose, and Pure Poppy. Then, the stripes were white heat embossed on the ornament.

All the elements were cut out using the matching dies. I also cut out from white card stock a skinny frame using the Papertrey Ink-Ink To Paper Dotted Skinny frame.
The next and final steps were to assemble. I adhered the skinny frame to the watercolor panel and adhered the whole thing onto an A2 card base. The starflakes and boughs were glued in place. I added some silver thread to the ornament atop and attached the Joy and ornament with a little foam tape. Lastly, I added a few sparkly clear gems.
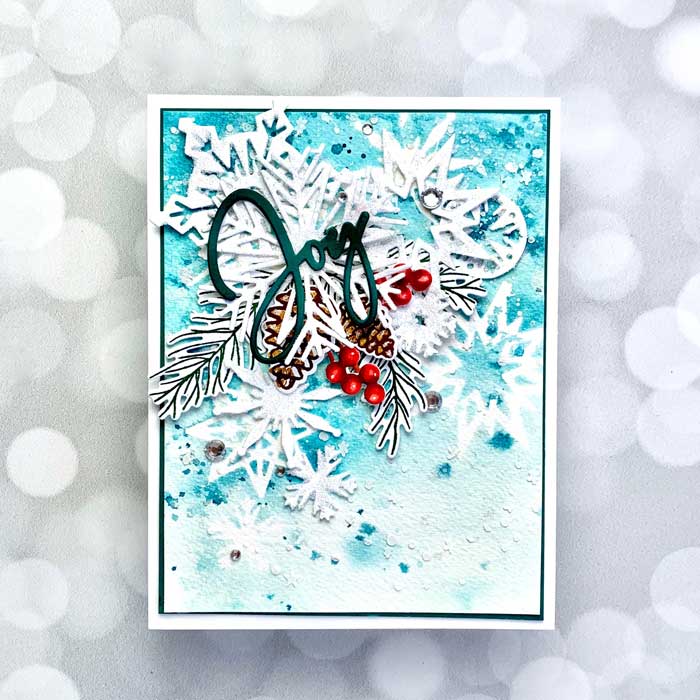
By the way, I made a second card. It was made in exactly the same way, but as you can see in the picture, pine cones and berries were added instead of the ornament. The pine cones are from Floral Christmas and the berries from Modern Gift Tag. I would love to hear which version you prefer!
Goodies List:
Sorry, the comment form is closed at this time.

September 30, 2020
Stephanie Clapper
Beautiful card! It’s like being in a beautiful snow storm and a real treat for this Floridian! Thanks so much for sharing your process!
October 1, 2020
Shauna Todd
Glad it was a cool refreshment from the Florida sun! Thanks for commenting!