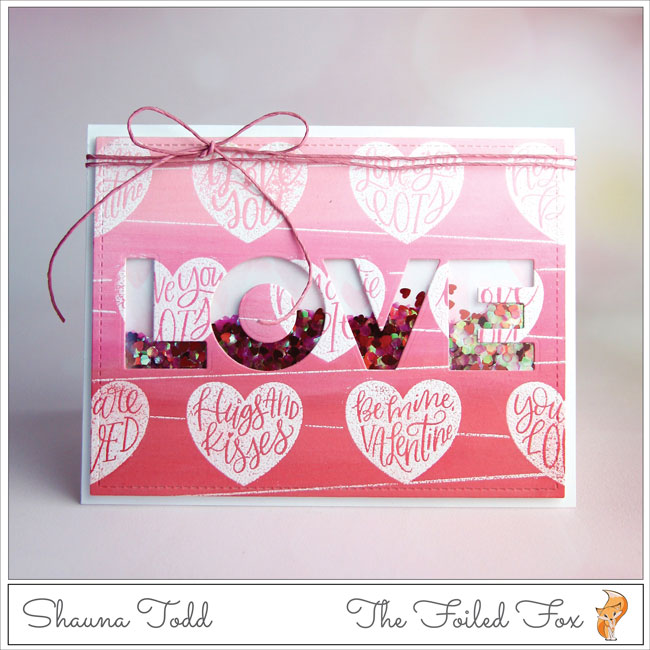
Show your LOVE with this fun shaker card
Hi Crafty Friends,
Today is the first day of a three card mini-series. Each of the three cards will use the same stamp set, Heart Art by My Favorite Things but with three different looks. So, ready to get started?
The first card began with the emboss resist technique. So, I started with my stamp positioning tool. For this one, I used the Tim Holtz stamp platform since it has open sides and is easy to work with a design where the stamps will extend over the card panel… you will see what I mean in a minute.
To make life easier for me, I have mounted with glue dots a plastic grid on the base of my stamping platform. This helps with getting the stamping straight and evenly spaced. If you are interested, I have included the plastic grids in the supply list below. Now, back to the project!
I centered a Neenah white card panel onto the platform, then placing three hearts in the center, spaced evenly apart, but centered. Using the grid as an aid, I counted the squares between each heart to make sure they were evenly spaced and made sure the point of each heart was on the same grid line. Then, for the next row, it will actually have four hearts when completely stamped but I only have three hearts I haven’t used so I spaced them in between the middle row and evenly spaced top to bottom too.
I generously prepped the paper with anti-static powder, then liberally pounced Versamark ink on the stamps, and stamped the paper. I inked the stamps and stamped again, to make sure I have a good impression. Then removed the paper from the platform, sprinkled white embossing powder over the top, tapped off the excess and heat embossed it.
With six of the eleven hearts done, I placed the card panel back onto the platform, making sure to put it in the exact place as before (I had marked on the grid with a sharpie where the panel and rows were before removing – it’s easy to remove the marks with alcohol later, when done). Then, added more anti-static powder to ensure the next stamping doesn’t have embossing powder where you don’t want it!
Next, I removed the previously stamped hearts and placed one in the bottom row to finish it and the other four on the top, again making sure all the rows were evenly spaced and repeated the same procedure as before – positioning, stamping and heat embossing.
I wanted to add some lines for more interest. So, using the My Favorite Things Wire background stamp and the heart panel back in the platform, I positioned the stamp over the panel. But, before I stamped, I didn’t want the lines to interrupt the hearts so I cut eleven heart ‘masks’ out of full-adhesive post-it notes (or any masking paper works too). I know this sounds like a lot of cutting but it was super easy because I was able to stack six layers on top of each other and cut six at a time – YAY!

With the masks over the hearts, I stamped the background stamp using Versamark ink, sprinkled white embossing powder and heat embossed. I then peeled off the hearts and VIOLA! – hearts and a lined background!
Coloring the panel was next, so using three distress oxide inks: Spun Sugar, Picked Raspberry and Festive Berries, I swiped the Spun Sugar ink pad on the top third of the panel, then the Picked Raspberry in the middle and finally the Festive Berries on the bottom. Hint: I have found that it is always best to start with the light color and go to dark so the dark color doesn’t pollute the light color.
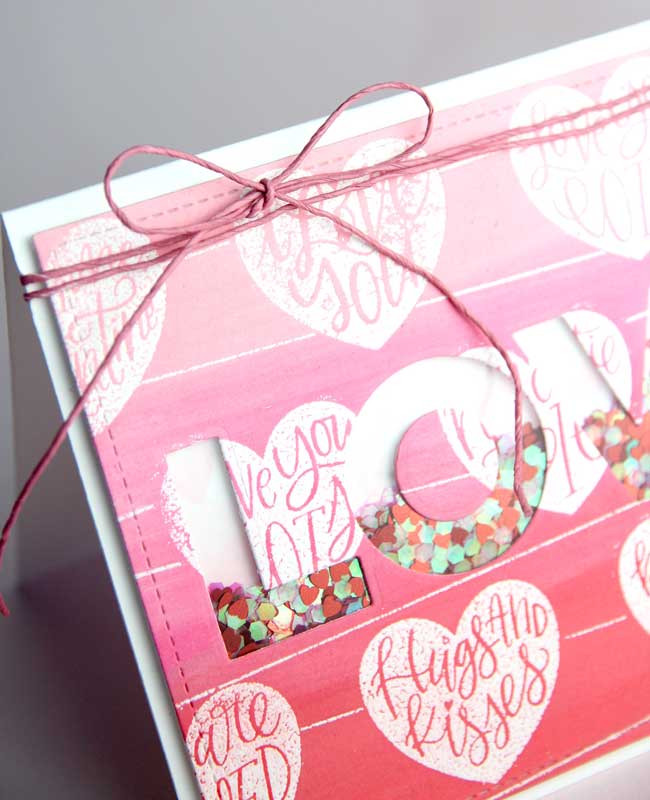
After the ink was good and dry, I polished off the ink from the embossed areas, then trimmed and embossed the panel using the largest frame of the Lawn Fawn Inside Out Rectangle lawn cuts. When that was done, I centered the LOVE die over the panel and cut out the word.
Does this sound scary to you? Every time I finish a panel, then have to cut something out of it, I gasp – afraid all my hard work will be gone – but be brave, it always seems to work out for me!
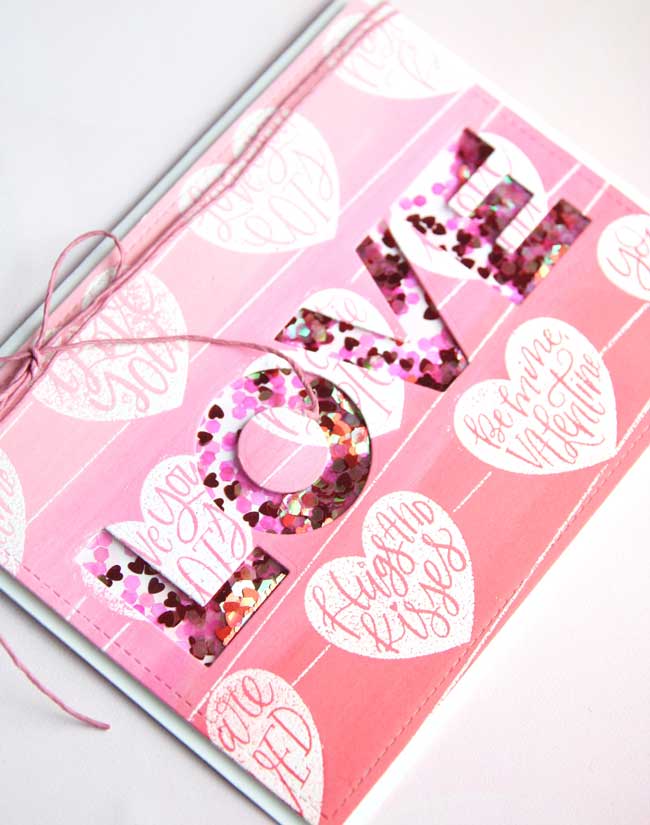
Now, onto the shaker, with LOVE already cut out, I glued a piece of acetate over the back of the word, added foam tape around the perimeter of the panel AND around the word to create a ‘well’ for the shaker bits. Then, I added the pink and red confetti from the Nuvo Cross My Heart confetti kit and adhered a small panel that I had previously stenciled hearts from the Neat & Tangled Heart Duo stencil with Spun Sugar distress oxide ink. Oh, and don’t forget to glue the center of the “O” onto the front of the panel!
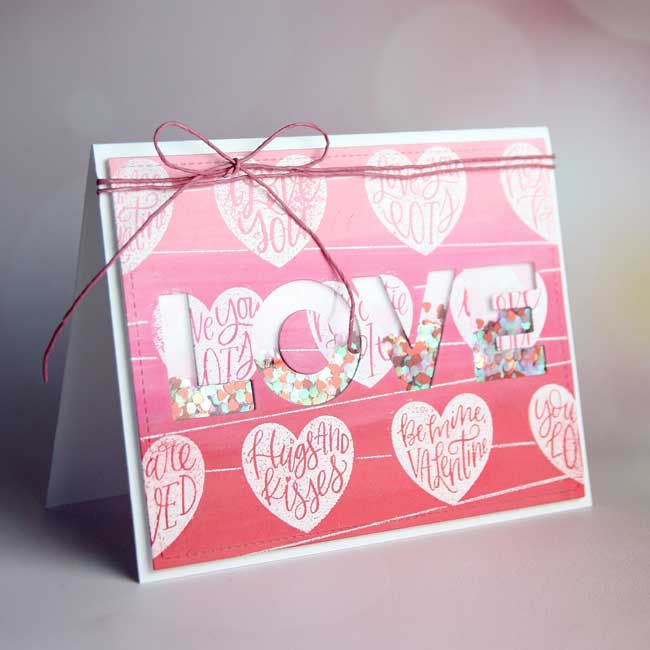
All that was left was to glue the shaker panel to a white card base and tie on some twine. YAY! the card is finished and the shaker was so much fun to make and a pleasure to give! ♥
Goodies Used:
Sorry, the comment form is closed at this time.

February 1, 2019
Lagene
Awesome LOVE shaker!
February 2, 2019
Shauna Todd
Thanks so much!