
Hi there friends,
Today we are visiting little piggy and his delicious treats! I wish I could eat one right now… who doesn’t love a tasty cupcake?
Anyway, I am getting sidetracked with the thought of cupcakes… I will set aside my instant sugar craving and move on to making this card.
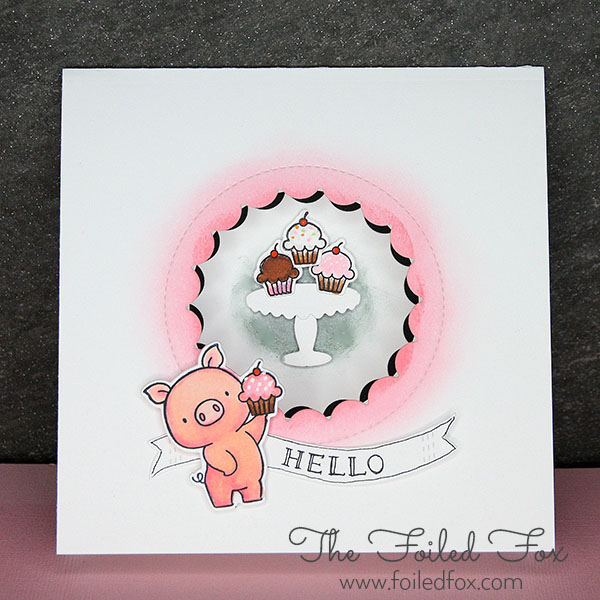
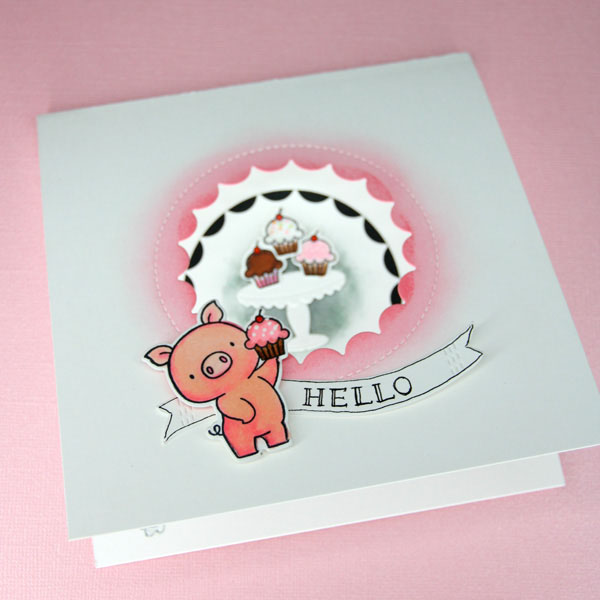
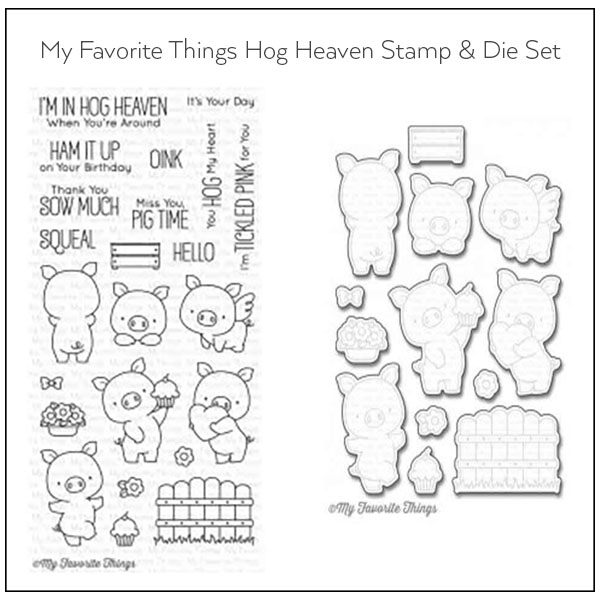
This card is a simple one to come together. It is a 5.5″ x 5.5″ card, one of my very favorite sizes and is created using My Favorite Things new stamp and die set, Hog Heaven and their new Jumbo Peek-A-Boo die. You can check out all the supplies used…just scroll to the bottom for a complete list.
As you may know, I am pretty systematic when making a card. I first stamp and color what I can, then cut and assemble. With this in mind, here are some quick steps to making this card happen.
.
First, using 110lb. Neenah solar white cardstock, I cut the paper 5.5″ on the long side, leaving a 5.5″ x 11″ piece, scored it down the middle and folded for the card base.
Then stamped the standing pig with cupcake and a bunch of individual cupcakes. These I colored with Copic markers. I used R01, R22, RV21 and RV13 for the pig and for the assorted cupcakes I used RV21, RV13, E33, E99 and E29. Once they were all colored. I die cut all the pieces, using the matching Hog Heaven die set. You can certainly fussy cut them if you don’t have the die set but I have to confess…. I do love the dies. It creates such nice, crisp cuts.
I also cut, from 110lb. white cardstock, the cake pedestal from the “Scalloped Cake Stand” die set by Poppy Stamps. Oops… it turns out this die is discontinued but you could use the Baked with Love stamp and die set from Lawn Fawn. I will show it in the supply list below.
Next, cut the ‘window’ in the front of the card base by using the “Jumbo Peek-A-Boo” die set (the scalloped die) from My Favorite Things.
Just a note about cutting the ‘window’ in the front of the card, be sure to center it well. Since the pig will be mounted below the circle, I cut the ‘window’ ever so slightly higher than center. That way your eye doesn’t think the circle is too low — a perception thing.
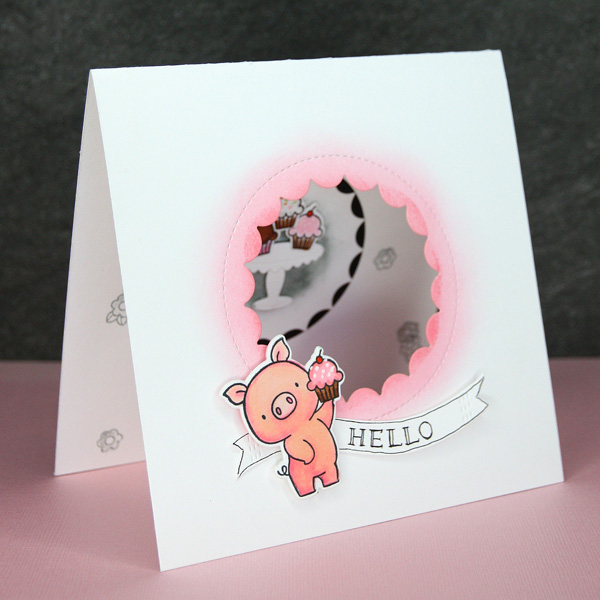
When you cut out the center window, it leaves you with the positive center cut-out. Don’t toss this into your scrap bin. This is used for the center in the inside of the card. I cut a black cardstock circle slightly bigger than this piece and mounted this white piece to the black circle. This will help create an effective peek-a-boo look a little later in the process.
I used a banner die for the “Hello” which came from the Wonky Stitches die set. Check it out in the supply list below. But don’t be afraid to cut one free hand or use a different banner die, if you happen to have one on hand. Or, just stamp your sentiment to the front – whatever your pleasure. I hand lettered the Hello and outlined the banner with a Micron .25mm pen but you could use a stamp and/or use any message you would like.

Using Spun Sugar Distress ink and a blending tool, I carefully applied the ink to the outside of the front scalloped cut-out. Then adding an extra layer of ink on the very inner edge to give depth. I also added a circle of gray ink on the white piece that was mounted on the black circle for the background of the cake pedestal. I used Memento’s London Fog from Sorbet Scoops Dew Drop set, but any gray you like will do.
Now ready to assemble, I adhered with a bit of tape runner, the white cut-out to the black piece. Since the white is from the ‘window’ cut from the front, it has all those points that line up with the scallop cut on the front. To make sure you see a bit of the black, I rotated it a few degrees so you still see the points but you also see the black. This adds to the effect.
Next, adhere the cake pedestal and the cupcakes to the center. Position the banner and adhere with foam tape the pig so he pops out a bit.
Since I am a bit crazy, I die cut another pig (without stamping), colored with matching Copics (including the cupcake) and outlined the pig and cupcake with a black Micro pen and stuck it to the back of the front of the pig before I added the foam tape. That way when you open the card, the pig looks like he has a back to him and it finishes it off nicely.
As a final touch, I stamped random cupcakes with the gray ink in the inside and added some sprinkles to the cupcakes with white gel pen and assorted copic marker colors.
Yay! the card is done!

Supply List:
 |
 Black Cardstock |
 Heaven Set |
 Peek-A-Boo die set |
 Wonky Stitches |
 Black |
 Distress Ink |
 Sorbet Scoops |
 Copic |
 Copic |
 Copic |
 Copic |
 Copic |
 Copic |
 Copic |
 .25mm |
 Gel Pen |
 with love |
